Pin It
I'm back! Although summer is still here I have Fall on the brain. Fall is my favorite time of year.
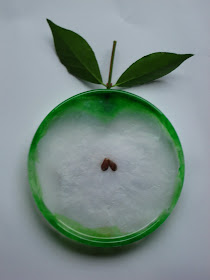
This is an easy craft, especially for all those Pre-K and K classes out there starting off the school year with an A theme. These are so easy to make and would make a great class Apple Tree display.
Supplies: clear glue, paint brush, clear plastic lids, hole punch, white, red or green tissue paper, stem with leaves (or use a brown pipe cleaner and green tissue paper cut into a leaf shape), apple seeds (or brown paper cut into seed shapes)
Day 1
Glue seed to inside of lid. Looks like a petri dish. Have kids arrange seeds using a toothpick.
Let dry overnight.
Adult prep: Determine top of apple and punch hole as far away from outside edge as possible.
Day 2
Rip tissue paper into small pieces.
Glue white tissue paper on inside of lid. Overlap paper for good coverage.
Easiest method. Squirt glue all over lid. Spread it with a paint brush. Lay pieces of tissue on top. Brush with a bit more glue on top. This way fingers should stay clean.
Rip green or red tissue into thin strips. Add glue around inside edge. Place tissue down and using the paint brush - gently push and coax paper into place. Children will need an adult to demonstrate how to do this. It doesn't need to be perfect. It actually looks better the less precise it is. Let dry.
Adult prep: Glue stems into holes. A glue gun is probably the fastest. Older kids can glue the stem into place when gluing the tissue on by laying pieces of tissue over stem like bandages to secure.
They make great sun catchers too! Tie a thread or ribbon through the hole so kids can hang them from a window.


