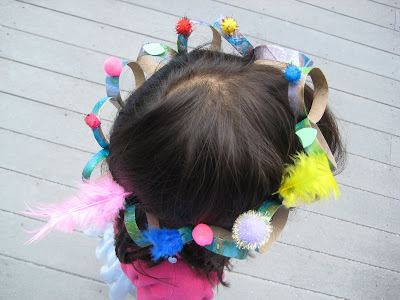
Paper Towel Tube Craft: Crowns

Day 1

Decorate paper towel tube. We used tissue paper, glue & glitter. Let Dry.

Day 2

Flatten tube. Make slits in tube, alternating sides approximately a half inch apart. Make sure you don't cut all the way across.


Puff up tube again. Slowly fold back rings. They will alternate as you go.


Pretty cool! But don't stop there!


Measure around child's head with garland. Trim and tape into crown. Give to child to decorate. Pom poms, feathers, gems, sequins and lots of glue. Let dry.


Just beautiful!

The girls want to do this again but use the garlands to decorate the doorways for Halloween. So we are saving our paper towel tubes! Enjoy crafting with your kids ;-) Mama King

Recycled Kids Craft: Apples

Pin It


I'm back! Although summer is still here I have Fall on the brain. Fall is my favorite time of year.

This is an easy craft, especially for all those Pre-K and K classes out there starting off the school year with an A theme. These are so easy to make and would make a great class Apple Tree display.

Supplies: clear glue, paint brush, clear plastic lids, hole punch, white, red or green tissue paper, stem with leaves (or use a brown pipe cleaner and green tissue paper cut into a leaf shape), apple seeds (or brown paper cut into seed shapes)

Day 1

Glue seed to inside of lid. Looks like a petri dish. Have kids arrange seeds using a toothpick.
Let dry overnight.

Adult prep: Determine top of apple and punch hole as far away from outside edge as possible.


Day 2

Rip tissue paper into small pieces.
Glue white tissue paper on inside of lid. Overlap paper for good coverage. 
Easiest method. Squirt glue all over lid. Spread it with a paint brush. Lay pieces of tissue on top. Brush with a bit more glue on top. This way fingers should stay clean.

Rip green or red tissue into thin strips. Add glue around inside edge. Place tissue down and using the paint brush - gently push and coax paper into place. Children will need an adult to demonstrate how to do this. It doesn't need to be perfect. It actually looks better the less precise it is. Let dry.


Adult prep: Glue stems into holes. A glue gun is probably the fastest. Older kids can glue the stem into place when gluing the tissue on by laying pieces of tissue over stem like bandages to secure.


They make great sun catchers too! Tie a thread or ribbon through the hole so kids can hang them from a window.


Aluminum Foil Bookmarks

Em's Mermaid & Lu's Fairy

Our first official craft project in the new home is actually an old project. Last winter we made a mermaid bookmark utilizing this same technique. Lu found her mermaid bookmark in one of the many boxes marked "miscellaneous"still left to unpack. She begged to make a new one. Feeling guilty for subjecting the girls to an afternoon of watching me unpack, I tore open a couple of craft boxes and found all the materials needed. 


Supplies: Scissors, Aluminum Foil, Contact Paper, Permanent Markers
Optional: Glitter and Tissue Paper

Have child draw picture on piece of aluminum foil. Trim design if desired. Cut 2 pieces of contact paper to size. one for the front and one for the back. Make sure there is enough room along edges to create a seal. Peel off backing of contact paper. Add glitter and tissue if desired. Place aluminum foil picture face down onto contact paper. Place a second piece of contact paper on back. Smooth and make sure edges are sealed shut. Trim if desired.

Kids can create a two sided book mark by drawing a picture on the other side. Older kids could illustrate two main characters from a favorite story, one on each side.

Thank You!


We are still here! Managing to have fun in the midst of unpacking and painting. I built this makeshift house for the girls to play in.  Hopefully there aren't any big bad wolves in the neighborhood.

Thank you for all of your kind words and support. I miss blogging and reading all your wonderful blogs! I can't wait to catch up on all your blogs. Just a giant cup of coffee and some ME time. A girl can dream can't she? Until then...

Check out Part One and Part Two of our 3 Little Pigs post if you've got a minute.

LinkWithin

LinkWithin Related Stories Widget for Blogs