Happy New Year!

Lu & her cousin, 12/31/09

New Art Easel = Heaps of Artwork (Already!)
Solution: Happy New Years Banner!

Wishing you a crafty 2010!
(...healthy & happy too!)

Thank you for following the 4 Crazy Kings in 2009! I appreciate & love reading all your comments. :-) Hugs, Mama King

They had stars in their eyes...

I took my niece and eldest daughter to an ice skating recital at Lu's ice skating school. They had their faces pressed against the glass through the good and the not so good. But if you ask them it was like watching the Olympics! A seven or eight year old girl walked by Lu & her cousin in a frothy pink costume and the girls nearly swooned. Lu said, "Mom, Mom, did you see? An ice dancer just walked by us!"

I heard Lu tell her cousin that some day she would be an ice dancer!

What did you aspire to be when you were little? Me, I wanted to be a prima ballerina. An unfortunate and massive growth spurt in middle school squashed my dreams. Plus, I am about as graceful as a hippo in tights and a leotard. :-)

Art Easel Review

I did not own an easel until I won this baby from Katie's Nesting Spot this past fall. I know it is hard to believe that a crafty mama such as myself did not own an easel for her budding artists but it was true. I had not bought an easel for my girls primarily because I wanted to get a good quality one (which equals $$$) and we also do not have a lot of extra room to set one up.

So you can imagine how thrilled I was to win this incredible adjustable easel and 27 pieces paint set, an $89 set from Early Childhood Resources, available at All Children's Furniture. I couldn't believe my luck. I would willingly figure out a storage solution for it!

I decided to save it for a Christmas present for the girls since they both had just had late summer/fall birthdays. My husband and I didn't open the box until Christmas eve to assemble, which could have been a bad move, but turned out better than we hoped. The easel is sturdy, well made and simple to put together. You can adjust the height of the boards which is nice. We set ours up on the lowest setting. The easel folds flat which is a great feature for those space challenged. Another great feature is the metal folding hinge. It is secure and locks the easel firmly in place versus a wooden hook and knob type closure I have seen on some easels. The girls can not open and close the easel and it won't fold up on them if bumped around. One side is chalkboard and the other is a plain chipboard. My only suggestion would be that it would be nice if one side was a dry erase board.

The easel also included an art kit which included various brushes, spoges and rollers, plastic paint containers and paints. The paint containers were great. They are the kind that allow easy access to the paint, are spill resistant, have nice resealable lids and are clearly labeled in big bright letters. They had color coordinating brushes so each paint pot had its own brush so no washing out brushes and mixing colors up - unless you want to. The paints were mediocre in quality, although I do have to admit I am a quality stickler about paints. I like for the paints to be thick, the colors to be vibrant and the paints should not flake when dry. It was nice that it did include paints so I am really not complaining. Overall, I would highly recommend this easel.


The girls and their cousin had a blast painting. I know the girls will enjoy this easel for years to come. It is a wonderful addition to our craft time.

Tip: don't spend a lot of money on those Splat Mats and Painting Mats advertised in catalogs. First of all they are $$$ and secondly they are small. Nothing works better than a vinyl tablecloth. It is large, cheap and can be wiped clean. I also carry one of these in my car for impromptu picnics.


Enjoy!

Stock Up For Next Christmas...

I stocked up on
Paint Your Own Ornaments (.27 cents each)
and a Foam Activity Kit Craft ($3)
for Lu & Em's class goody bags...next Christmas.

There are some great after Christmas craft bargains out there.
Happy Bargain Shopping!

Christmas Highlights...

Leaving treats for Santa & his Reindeer
The calm before the storm...
Santa Came!!!!!
Our favorite toys...
Enjoying family.
A quiet moment with Penny the dog.

Hope yours was MERRY too!

Christmas Craft for Kids: Last Minute Gift Cards & Tags


This seriously take five to ten minutes to prep. It is well worth it and will buy you time to wrap gifts or drink a cup of coffee in relative peace. Emme sat and collaged for almost 45 minutes.

Take a gardening catalog. Begin by quickly tearing out pages with lots of Holiday arrangements and wreaths. Roughly cut out the flowers until you have a decent size stack. I used pinking shears but it is not necessary. Place glue in small container with a brush or use a glue stick. Give child card stock. Have them glue and overlap the pictures. Tell them to cover as much as the white space as possible. Let dry. Trim, fold, add ribbon.


Older kids could go back into collages with glitter glue if the wanted to jazz it up even more. I love getting the gardening catalogs but hate throwing them away. You can do this project again in the Spring for Mother's Day. It looks very pretty.

Christmas: Last Minute Gifts Under $5


This is a great last minute gift for a Grandparent. I got these calendars in the $1 zone of Michaels Craft store. They have a plastic cover that comes off. Perfect to fit 2 photos underneath, one on each side. I am just waiting to get the photos from Kodak Gallery ...hopefully tomorrow. But if not I'll run down to the drugstore and print out a few. My mom always carries one of these in her purse so I am sure she will appreciate this simple gesture from the girls.


Also found this little ornament at Michaels for...under $5...I can't remember exactly. But don't you think this the cutest frame? I bought two, an oval and a rectangle, for each girl. I think I may put this in my stocking this year I love it so much!

I am posting twice today because I will be taking Thursday through New Years off. I hope you all have a Merry Merry Christmas filled with all sorts of love, hugs, joy, surprises, silliness and laughter! Hugs, Mama King

Dairy-Free/Egg-Free Chocolate Cookies


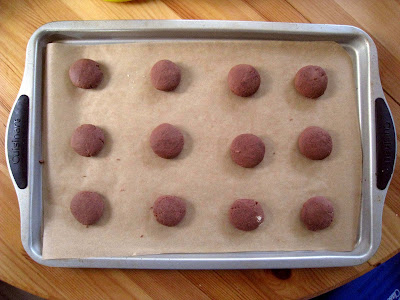
Finally! A recipe that is not only dairy (we use soy butter) and egg free - it is sooooo easy! Oh yeah, and doesn't taste like dirt. Don't get me wrong, the addition of real butter would make these taste even better but for a kid who doesn't know what real butter tastes like (Paula Dean's worst nightmare!) she thinks these are pretty scrumptious. Wahoo!

The recipe originally found in Reader's Digest is a Nigella Lawson recipe. It is not available on the RD site but I found it on Oprah's site. Click here for the recipe, Chocolate Shortbread Christmas Cookies.

One of the best features of this recipe is that you simply dump all the ingredients in a food processor. This made it so fast and easy. I helped Lu measure and dump the ingredients. I closed the food prossesor and let Lu press the button. After that you simply scoop (use a mini ice cream scoop with a release button makes it even easier!), flatten & bake! Love it! I may be crafty but I am not even remotely skilled in crafting cookies, cakes or pies. Too precise of a science for my artistic spirit! These are so easy I am making another batch before Christmas since the girls and hubby are making their way through these.


After you bake them and they cool you mix up an easy glaze/frosting and then add sprinkles...


Can you tell I let the girls loose with the sprinkles!

What We Are Working On...

Things are starting to get busy. How about for you? Here is what we are up to.


Stocking Stuffer: miniature felt crown for favorite stuffed cat, Annie.


Centerpiece for Kids Table, Christmas Dinner: Gum Drop Tree
Slow process. Both girls like doing this for about 5-10 minutes at a time.
Sooo...it takes a while.


Finishing Lu's Mini Book. She decided she wants to give it to Daddy for Christmas.

Making a bunch of tutus for all the princesses in our lives!
Plus one mini tutu for stuffed cat.
See Treasures For Tots Blog for tutorial.

Picking up Papa King's Christmas gift...
This is a picture of the stores store front all decked out for Christmas.
Any guesses?


Plus, trying to make time to spend outside playing and simply enjoying the Holiday!

Christmas Craft: Make A Mini Keepsake Book


Katie's Nesting Spot inspired us to try our hand at our very own predictable reader. The phrase "This is..." appears on each page. This style of book is great for pre-readers and early readers. Check out Katie's book she made for her daughter, ER. It is about the different colors Christmas lights.

For our book, Lu used Christmas stencils. She had never used a stencil before and really enjoyed using them. I have a feeling she will be asking to use them again!


  • Take some scrap paper, fold, punch two holes in the center fold and tie together with ribbon. I used card stock as the outside piece to give it more of a "book" feel. You could also use the card board from a cereal box.
  • If using a stencil, tape down the stencil sheet first. This prevents the stencil moving around as your child colors. There was no tree on our stencils sheet so I cut one out using card stock.
  • Lu decorated her tree with stickers and glued on a card board star that she colored.


I am off to help Lu finish her book. We still have more several more pages to fill, plus there is the cover to think about! I know when we are done Lu will enjoy reading her book to her sister, stuffed animals, Grand Parents and probably even the Mail Man! This is one that we will save. I am thinking about tying a loop on it and hanging it on the Christmas tree as a mini keepsake book. Have fun crafting with your little elves!

Our Christmas Tree


Our tree is full of handmade ornaments, family ornaments and ornaments given to us by dear friends. Each ornament is significant and beautiful in its own way.

I thought I would showcase some of the handmade ornaments on our tree to give you some crafty ornament ideas.


I have several of the ornaments my mother made back in the 1970's. These are made with straight pins, sequins, beads, trim and a Styrofoam ball.


Lu's first Christmas. I suppose this is where our love of Model Magic began :-)
MM is so light, unlike plaster, it makes for a great ornament material.


Both of these were made by my niece. The glass globe ornaments was filled with paint then swished around. The bead string ornament (on left) is just that.


Made by my BFF's sons when they were little. So simple but I think very elegant!
Glitter glue, Popsicle sticks & some gold string.


Air dry clay, cookie cutter & paint


My hubby made this one. Seriously! I signed him up for a glass blowing class and this is what he made. I was impressed.


Lu just came home from school with this one. So cute! Real marshmallows glued together, glitter, felt scarf, buttons, stick arms & a photo of Lu wearing a snowman hat. So cute! Unfortunately, I don't think this one will last more than this Christmas.


Modeling clay. One of my students made this for me when I was teaching. She also played the flute at my wedding. Love her! She's a Surface Pattern Designer now! Shows you how old I am!


Another of Lu's school projects. She made this last Christmas. Popsicle sticks, felt, foam, googly eyes and ribbon.


Lu made this for her Daddy. He always used to lament that his mom threw out his pine cone bird that he made when he was a child. It was on the Christmas tree every year until his parents moved to a retirement community. He would describe it in great detail and mourn its loss. It was a long running joke between hubby and his mom. So last year Lu and I made one for him and one for his mom's tree. Grammy just about bowled over from laughter when she opened it! Well, we did a pretty good job. It got Papa King's seal of approval and is a happy man.
I tell you mamas out there don't underestimate the significance of the traditions you start now with your wee ones!

Body: pine cone, feathers, glitter glue painted onto the pine cone
Head: Styrofoam ball & feathers
Eyes: 2 straight pin, 2 sequins, 2 beads
Mouth: snipped the end off a yellow straw using a V cut. Stuck tip of straw into head leaving the V shape exposed.


Lu made this today. I love it. If Marc Chagall were to paint a Santa I think this is what it would look like.

Have fun crafting with your kids! It is time well spent!

Homemade Christmas: Make an Easy Fairy Crown


Take two cheap wired based headbands that have a knit like covering. They are often sold in packs of 4 at your local drug store. The wire base will allow you to manipulate the shape of the headband and the knit exterior will allow you to sew them together. I used a combo of sewing through the knit exterior and wrapping the thread around to ensure it was a strong connection.


Use your child's head to size. Sew together as shown in the picture. After sewn together I pulled and manipulated the headbands to make it look more circular.


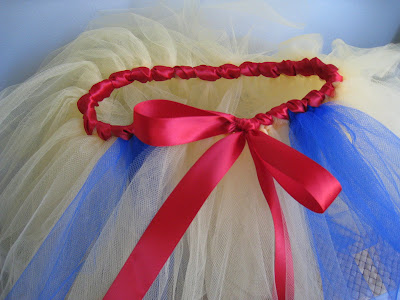
Have ready: long pieces of ribbon and tulle cut and ready to go for the back of the fairy crown. Take a really long piece of ribbon (I am sorry I didn't measure mine.) I used satin ribbon. Starting in what will be the back of the fairy crown. Leave a long tail - you will be tying it off at this point. Hold the tail tightly. Start wrapping ribbon around. Overlapping as you go. Make sure it is tight and neat. I ended up holding the tail between my knees once I had wrapped a few inches. Wrap all the way around until you get to the tail piece. Tie together once - pull tightly. Place the cut tulle and ribbon in center of knot and tie again - securing tulle and ribbon in place. Tie a bow - double knot it so it doesn't come loose. You could put a dab of hot glue there too. If using satin ribbon you can slightly melt edges of ribbon by holding end briefly above a lighter. Do this in a well ventilated area as I don't know that it is good to do this. Please be careful! What this does is it ensures the ends won't unravel. If using grosgrain ribbon - use fray check.


You could jazz it up even more by adding silk flowers or leaves. The color combinations are endless. I chose red for Christmas but can't wait to try it in a rainbow of colors!
This would also be beautiful done in white for the little ones who like playing bride!

LinkWithin

LinkWithin Related Stories Widget for Blogs