Waking up to snow...


Lu's favorite thing to do when she hears it is snowing is to pop out of bed, run down stairs and sit at the big window and watch it snow. This morning she brought along a few of her friends.

Stay warm, be safe and enjoy the snow!
(I'm not talking to you my fortunate friends who live in sunny and warm locals.)

Easy Book Making for Kids


Here is my inspiration. Aren't they cute!
These little play books were included with some toy Calico Critters that Lu got. She was just as smitten with the miniature books as she was with the Critters. The books were a piece of accordion folded paper and a sticker cover that held the book together. So simple!

While Lu was at school I made her a few to decorate when she got home. You could easily decorate and then assemble. It is up to you. I kept the books small but big enough for her to write a letter or draw a picture on each page.


Supplies: Paper, scissors or paper trimmer, and sticker paper (the above is Staple brand)
Optional supplies: Markers, Stickers, Glue (in case you don't have sticker paper) and ribbon (to create a tie)


Trim paper & fold.
An easy way to do this is to fold the strip in half and then fold one of the halves in half and so on. You want to make sure you end up with either end page facing out.


This book is 2" x 3" 


Cut sticker paper to size of book and fold.


Option: lay a ribbon across sticker paper and then place book on sticker paper. Do one side at a time and make sure it is lined up. If you are not great at this, try making sticker paper bigger than pages and then trim once attached. 

They are so easy to make! You can use pretty scrap booking paper if you want to get fancy.
I have a feeling Lu will be "writing" a ton of books for her dolls and stuffed animals in the near future. Good thing because I think we are going to get more snow here on the East Coast. 


Kids Craft Weekly: Wooden Spoon Poppets


 A friend gave the girls this great DIY craft kit. She got the idea from Kids Craft Weekly. The site even provides printable instructions and supply list. You assemble the supplies, print out the cute instruction sheet and give it to a friend. Click here for the instructions and more DIY craft kits from Kids Craft Weekly. The girls enjoyed making their spoon dolls. It was a neat surprise.

Kids Craft: Paper Flower Garland

Flower Garland: the perfect accessory for all woodland fairies!
Flowers can be replaced with leaf shapes or just about any motif (stars and moons...maybe.) 


Cut out flowers. I used a flower punch.


 Paint (we used water colors), let dry, add glue & glitter and let dry again. You can also let child paint a piece of paper, let dry and then punch out flowers shapes. Although, I think Lu enjoyed painting the flowers. There was something novel about it.


Cut a 1" x 11" strip of card stock. Punch a hole at each end. String a piece of ribbon or yarn through each hole. Tie knot. We painted ours green. Cover liberally with glue. Have child place flowers down. Overlap and add more glue where needed. Let dry.


The flash blew out this photo too much so I had Em model the garland (top photo) while Lu was in school.

Have fun crafting with your kids.  

Maze Craze


We are maze crazy here at the King house. I bought Lu a Kumon Maze book and she flew through it in one sitting! After inspecting the Kumon book I realized we could duplicate the look very easily on my computer. I used Illustrator, but you could use any drawing program. Lu and I (Lu was the Art Director) whipped up six mazes in about 10 minutes. Just use a large brush (I used 45 pt) to create your maze. So easy and fun to make. At this age, Lu doesn't mind redoing the same maze. So print out a couple of each and save them for another day. 

Mazes are a great way to help children develop writing skills.

On a similar note, Emme is cutting crazy. She sits at the table quietly and cuts everything up into tiny pieces. This girl can focus. I'll give her paper but then find her having silently moved on to anything she can get her little hands on. I am making some cutting pages with lines for her to follow so she will stop cutting up the mail, my unread magazines, my husband's Valentine's Day card...

Simple Weaving for Kids


I saw this activity in a back issue of High 5 Magazine. Lu and Em love High 5. They love the stories, poems, hidden pictures and activities in High 5. Plus, getting something in the mail once a month is pretty exciting.

Why weaving? Weaving is great for improving:

Eye / Hand
Fine Motor Skills 
Under / Over
Patterns 


Supplies: box lid, rubber bands, ribbons cut into workable sections

The great aspect to this activity is that your child can practice and then pullout the ribbons and start over again. The wider the elastics are apart the easier it is for smaller kids. Place the bands closer together if it is too easy for your child. We used a tie box. When we are done, the ribbons and rubber bands can be stored inside to be used again.

Happy Valentine's Day & Happy New Year


The girls got a pair of heart glasses and a butterfly cupcake. The cupcakes are packaged to go because we are going to Grandma and Papa King's to pay our respects for the Korean Lunar New Year, Sol Nal. The girls have been practicing their bowing!


Have a wonderful day! 


Hope it is filled with lot's of hugs and little kisses :-)

 To make the cupcakes, cut off the top of a cupcake. Frost the cut side. Cut top in half to make wings. Place on frosted cake. Pipe center. Decorate! I let the girls decorate theirs.

Snowed in and loving it!


You would never know it was snowing outside the way Lu is dressed. 
But snowing, it was! We had a great day of playing in the snow, hot chocolate, baking scones, card games, dress up and this... It started out as a lentil tray and has gradually grown into a mix of beans, noodles, oatmeal... Basically an "end of the box" soup of fun! We also moved up to using the water table. Much better for two kiddos. 


We went out bright and early yesterday and built this little snowman. Look at him after about 6 hours...


Oh no!!! Help! 


Got to cut the grass... 

Have a great day! Off to play in the snow :-)

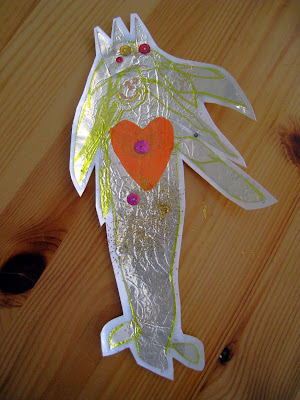
Foil Mermaid Book Mark


A good friend made a beautiful mermaid bookmark for Lu. She absolutely loved it!!! 
She then told us how she made it so we could make one. It was very easy and a great activity for children 4 years and older. 

Glue a piece of aluminum foil to a heavy piece of paper. 
Give child a permanent marker (so ink wont smear) and have them draw their picture. 
Give them a dull fork (Lu used one of our baby forks) and have them "draw" on the foil. 
Cut out drawing. 
Glue to another piece of heavy paper. 
Add sparkles, tissue, sequins... 
Cover with a piece of contact paper. 
Cut out leaving an edge to seal all the glitter and sequins in!

Lu gave this one to me. I smile every night when I open my book and see it smiling back at me!
Afterward I thought it would be cute if we had put a photo of Lu's face as the mermaids face.Next time...

Remember to always date your children's special art pieces and label them if you have more than one child. I will always want to remember Lu was 4 and a half when she made this for me!

Weekend Recap: Making Crayons & Crazy Paper Tube Sculpture


We finally got around to making some crayons. It took forever to peal all the crayons! We thought we had a huge bowlful...  Turns out it only made 5 muffin tin crayons. Which is OK since it was a fun activity and the girls enjoyed watching the crayons melt before their eyes. Both girls are having fun using their homemade rainbow crayons.


I was trying to make a funky lantern... It is not so much a lantern but I think it came out pretty cool. Plus, the girls think it makes a funny hat. You need a paper towel tube, scissors and a stapler. Paint would make it look festive.

Simple Mardi Gras Mask Craft


My friend Linda came up with this great mask activity. This is one of the those projects perfect for a broad age range. Older kids can get more creative and embellish their mask. Begin with a piece of card stock. Trace a pair of sunglasses that fit your child onto the paper. This will be the back of the mask. The sunglasses will help you determine where the eye holes should be. Pretty clever! 

We knew we were going to create a butterfly mask, so I went ahead and traced my daughters hands on the same side as the sunglass outline.


Next turn the paper over and decoupage tissue paper onto the mask. We added sequins and glitter. Since you do not want glitter or sequins near a child's eyes I covered the paper with contact paper after it had dried. This sealed everything inside. Cut out mask into any shape desired. Attach (tape or hot glue) to a straw. stick, dowel, chopstick... You get the idea.


We went to a Birthday Party last weekend and the Birthday Girl was wearing the cutest headband. I asked her mom about it and she remarked that she paid over $20 dollars for it! Well, being the resourceful mama that I am I went home and whipped this up in 10 minutes for probably a a dollar. We had all the  supplies already. I roughly cut out a bunch of tulle circles by folding the tulle over several times and cutting out all the circles at once. I began by folding the circles into quarters and threading them on the needle. I used about six quarters. Then I just threaded the rest of the circles on, without folding them. I then sewed the flower onto a sparkled children's headband. If I were to do it over again, i would probably make the circles smaller, otherwise I thing it came out cute!


Valentine's Day Craft: Candy Flowerpot


Candy flowerpot for your Valentine.


The tin buckets, flower lollipops and Valentine's decals I got at the Christmas Tree Shops for about five dollars total. Add the chocolate of your choice for the "dirt" and you've got a cute Teacher gift or Grandparent gift. Lu really enjoyed adding the rub on decals. She and Em used the extras and made Valentine's. 

Note: we used a clean yogurt container with a hole in the bottom to support the flowers. Place container bottom side up in pot, place lollies in hole, and add chocolates.

Pocket Tissue Holder: Bless You!!!


Thought I would try Skip To My Lou's simple tutorial (click here) for a pocket tissue holder. 
My kind of sewing project...EASY!

What a great little "no special reason" gift for someone. 
Think I'll stick a piece of tissue paper out of each one that says, Bless You!

LinkWithin

LinkWithin Related Stories Widget for Blogs