The Sand Table


Today's craft session (also known as Em's nap time) was spent making more paper plate puppets (Cinderella and company), playing with beads in silly putty, and reading books. Pretty quiet and nothing too exciting to show. So I thought I would show off our new sand table. The girls love it! I put some shells in the sand which made sifting and digging the sand very exciting. A project I have filed away in my mind - plaster of paris bones for excavating!

I like this table because it has an umbrella, a tight fitting cover that bungees on, is child height and most importantly, is mobile!!! Great for us who are limited in space. We have a huge deer problem. We counted 25 deer hanging out in our back yard. Which means a whole lot of poop and possible ticks. Until we can put up a deer fence in the backyard the girls and I are limited to the front driveway. I can wheel out the cart for play and wheel it back next to the garage for storage. I also like that when the girls out grow the sand table they can use it as a lemonade stand! I know they are going to play with this for many years. Edit: The sand and water table is listed on the Step2 website as being $79.99. I bought mine at Toys R Us for $59.98.

This is our water table. I bought it before Lu was even walking at Ikea for $5! It was advertised as a table with toy storage (it has a removable clear plastic top) but I knew back then that it would make a great water table. We use it year round! I keep the water and separate mainly for storage reasons. The sand table was advertised as a sand / water table but putting a lid on wet sand in the summer spells mold.
Have fun crafting with your kids, Mama King!

Katie's Nesting Spot & Frugal Family Fun Blog Rock!

I wanted to thank Katie for such an amazing post about winning 4CK's first giveaway. She raved about the Mama King (that's me!) designed cards she actually brought a tear to my eye! I tell you! That Katie is pretty awesome! I am so glad she won. Katie is not only a crafty soul mate but she is also an adult adoptee! So if you haven't been over to her blog check it out! Being the super amazing person that she is she actually has two blogs that I read daily. Katie's Nesting Spot and ABC and 123. Katie's Nesting Spot is her personal blog and features projects she does with her daughter, crafts, sewing, and family. "ABC and 123 is a Learning Cooperative
A place to collect & borrow teaching tools, share & receive inspiration, explore & review professional resources for those who love to learn & teach and those with lots of time & those with limited time to invest in their children."

The other blog I want to give a shout out to is Frugal Family Fun Blog. It is not only because I just won my first blog giveaway...talk about blog karma! Valerie has amazing ideas and is so resourceful. She was just featured on her local morning TV show for Earth Day Activities. She has a great field guide project I really want to put together a for Lu and Em.

I also love that Valerie & Katie leave COMMENTS!! I know many of you are already fans of Katie's and Valerie's but for those of you who haven't read their blogs I highly recommend them! So give them some blog love and tell them I sent you :-)

Puppet Theater


We bought the girls a sand table yesterday. Both girls were very excited about the sand table until I opened the box and the sand table was in several pieces. I began to scratch my head as I looked at the parts meanwhile Lu made off with the box...giggling as she dragged it away. So Em's nap time was all about...what should we turn our box into. The possibilities were endless. Lu quickly gathered some of her squirreled away treasures (she is a little crafty chip off the old block) to decorate the box, some Christmas wrapping paper, a piece of a pink boa, a pink flower, and some ribbon.

While we were brainstorming I turned the box inside out. Much better to start with a blank slate.

I suggested a puppet theater and LU went crazy for the idea (although I don't know if she knew exactly what a puppet theater is.) I cut off the bottom flaps, cut a big door on one side and a window on the other. I folded the top 2 sides and back flaps in and left the front flap up as the marquee. I secured it with a piece of cardboard to make it stiff. I also quickly sewed a curtain from a fabric scrap and strung it on some ribbon. I punched 2 holes each on the side corners and secured the ribbon by tying it tightly.

I quickly made some puppets from Popsicle sticks and paper plates. I cut slits into the two side flaps (which I had folded in earlier) to hold the puppets.

I made a removable sign from one of the flaps I cut off. It is secured with clothes pins. So it can be changed out for different productions. Lu has already requested a sign that says the Animal Show and Cinderella.

Lu and I decorated the front. This will be an ongoing activity. Stickers will be added, other objects will be glued to it... We already glued on one of our ribbon spool flowers to the front and drew on the sides since these pictures were taken!

Ta-daa! The L + E Show!

A happy little girl :-) She already has plans for her next box...a pirate ship! Ahoy!
Have fun crafting with your kids! Mama King

Quick & Easy Starfish


Paper
Scissors
Paint
Pencil with Eraser
Glue
Hole Punch

Cut out 5 Starfish Arms. Kindergarten children should be able to do this if you draw a line for them to follow. The arms do not need to be exact or symmetrical so this is a good early cutting project.

Arrange arms by overlapping them. Glue in place. Dry.

Dip eraser end in paint and stamp dots all over your starfish.

Lu wanted to put the number 5 in the center because a starfish has 5 arms.

For extra dimension we punched small holes all over the starfish.
EDIT: A Touch Of Country made an excellent suggestion on the comments page. She did a similar project with her students and had them glue oatmeal to the Starfish. I think sand would also work well - although you would have to glue starfish to a piece of cardboard since sand can be heavy.
Have fun crafting with your kids! Mama King

Model Magic Lion

OK! I promise this is the LAST Model Magic project! Lu and I just loved playing with the stuff! We usually work 2D so this was a nice change for Lu.

Model Magic or Clay
Marker
Optional:
Paper Plate
Glue
Sand
Googly Eyes

Start with a ball - Smoosh it

Fold top over - Pinch up ears

Make eyes with marker cap - look familiar? The owl inspired the lion! (sounds kind of wise...the owl inspired the lion.)

We used a crayon to make indents for a mouth

ROARRR!

Carefully cut mane around bottom of face

The body - Roll a fat cylinder - Smoosh

Legs - Roll skinny cylinders - Smoosh

Tail - Roll long skinny cylinder - Smoosh one end - Cut slits into flat end of tail

Assemble - Oh - Lu's legs came out so fat we only used two of them. I had her make a slit on the bottom of each one.

Proud artist! She wanted to color him, add the googly eyes and make a home for him in the jungle. See first photo. Have fun crafting with your kids! Mama King

Sunday Snapshots: You're Craftastic!


Here is a craft project submitted by one of 4CK's Followers, Kristen. She does not have a blog...but should! Because as you can see she is quite crafty! She and her kids made these pillows from scratch! The kids had fun picking out their fabrics, stuffing the pillows and then gluing (hot glue gun filled with fabric glue sticks) on their felt initial.

One of 4CK's earliest followers, Laurie, sent in some pictures showcasing the tulip favor cups on her beautiful Easter table. She also gave me a craft challenge...End of Year Teacher's Gifts. A great suggestion since Teacher Appreciation Week is coming (Two birds - one stone!) I'll put my craft hat on and start thinking!


Thanks for sharing! Keep the pictures coming. If I get enough Sunday Snapshots may all be Follower submitted projects! By Follower I don't mean you have to officially follow...just if you check in on us from time to time. Have fun crafting with your kids! Mama King
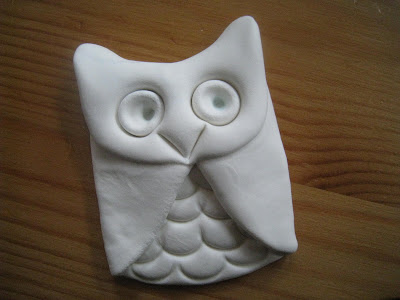
How To Make a Quick Clay Owl

Pin It
Wow, what a week this has been. It is not that anything different happened this week it is just that I didn't have the energy and felt completely scattered all week. This ever happen to you? For example, I packed the prize boxes, of course forgetting to put in a nice note to all the winners, then I couldn't mentally gear myself up for: juggling two kids, 5 boxes, rain, and most likely a line at the Post Office. So the boxes drove around with me all week. I finally completed the task yesterday...it wasn't even that terrible of a task. I hope you all love your cards! Sorry for the delay.

I also wanted to acknowledge all of the people who entered my first giveaway! I read all your comments and appreciate what you had to say. It seems like you are all looking for easy crafts for kids...my specialty! So, keep writing to me! I love hearing about your ideas, suggestions and adventures in crafting!

Here is a quick how to I came up with while Lu was making beads. This would be fun for grade school/middle school kids.

Start with a ball (we used Model Magic.)

Smoosh to make circle

Use marker cap to make UUUUUU's on belly

Fold sides in

Fold top down - pinch ears a bit

Use marker cap to make eyes

Use butter knife or similar to make beak -
Finally you can play with a bit by smooshing sides a bit to make owl more round.

Let dry and paint. We used Model Magic here but any clay or modeling clay would work.

Click here for a variation.

Mother's Day Ideas: Card Board MOM Sign


This is a project for older children. I should think with an adults help an eight year old could manage this. I left the cardboard unpainted but you could spray paint it.

cereal box
paper cutter or scissors
glue gun

cut box into 7 one inch strips


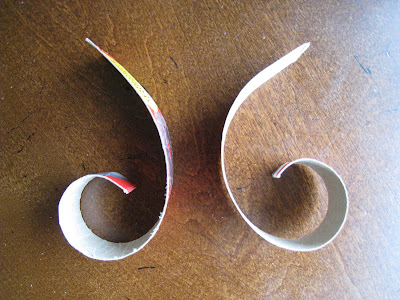
curl 4 strips - start by running your fingers along the length of the strip several times - pulling up as you go. This will make it easier to then wrap the strip around your finger to curl.

To make a M: start with 2 curled strips

One strip folded in half to form a V. Notice the two ends are folded.

You will be gluing these items together. You will also be gluing a piece of ribbon to the top of one of the M's points.

Like so:

Place a bead of glue in fold of bottom point. See picture. This gives your M more rigidity. When your done gluing it should look like this. Repeat to make 2nd M.

To make the Heart O: Fold one strip in half and curl like so. Glue at base of V. This piece will be called part A.

This is the tricky part...well simple to do but hard to explain. Glue the two M's together mid curl. See photo. Leaving approx an inch or more to create a V which will be the base of the Heart. Glue part A to the V. See picture.

When you are finished it will be fairly sturdy. I think this came out so cute. It seems like it has a lot of steps but it isn't as hard as it looks. If you have middle school kids - I think they would have fun doing this and then probably wanting to figure out how to do their own name.

Here is a variation:

Have fun crafting with your kids! Mama King

LinkWithin

LinkWithin Related Stories Widget for Blogs