Showing posts with label kids crafts. Show all posts

Giant Eye Spy Art Piece


We saw this giant eye spy at our local kids museum. Isn't it great? What a great idea for a pre school class or playroom! This would be easy to do with a bunch of those photo laser stickers and a large thrifted tray.  Spray paint the tray white, add stickers and hang.  Awesome!

Kids Craft: Bow & Arrow Set


The girls are Merida crazy despite the fact we haven't seen Brave.  We are almost to the end of the junior novelization of the story and of course you can not miss all the advertisements and product hawking that goes into any movie these days. Lu has been asking me to make her a bow and arrow set for a while so...here it is! To my surprise it actually works. This was the lazy mommies attempt at making a bow and arrow set. I am sure I will be amazed when I bother to google homemade bow and arrow sets.  This took about 10 minutes from start to finish.  The paper towel tube is by far her favorite part of the set.  She is walking around with it on now!

Have fun crafting with your kids! Mama King

Year End Autograph Hat


Tomorrow is our last Daisy meeting of the school year. Our last activity will be autographing hats. I just finished ironing the daisies on!  These should turn out cute and remind the girls of Daisies over the summer. The two baseball hats are leader hats.

Hope you had a fun and relaxing Father's Day! Mama King

Korean Paper Hat Craft


Recently we went to a Korean Cultural Celebration at our local college. They had several craft stations set up...calligraphy, book marks, and this, paper hat making. This was the girls favorite activity. They had the hats folded and ready for the kids to decorate with dot paints and tissue flowers.


I dissected the hat to show you how simple it is to make one. Take one large piece of paper.


Fold top edge down about an inch.


Fold paper in half.


Fold bottom edge about 1/4 - 1/2 inch.


Tape along edge.


Tape strings for ties by the corners with the wide fold. The wide fold is the front of the hat.
Let children decorate with paints, markers and tissue flowers.

Have fun crafting with your kids!

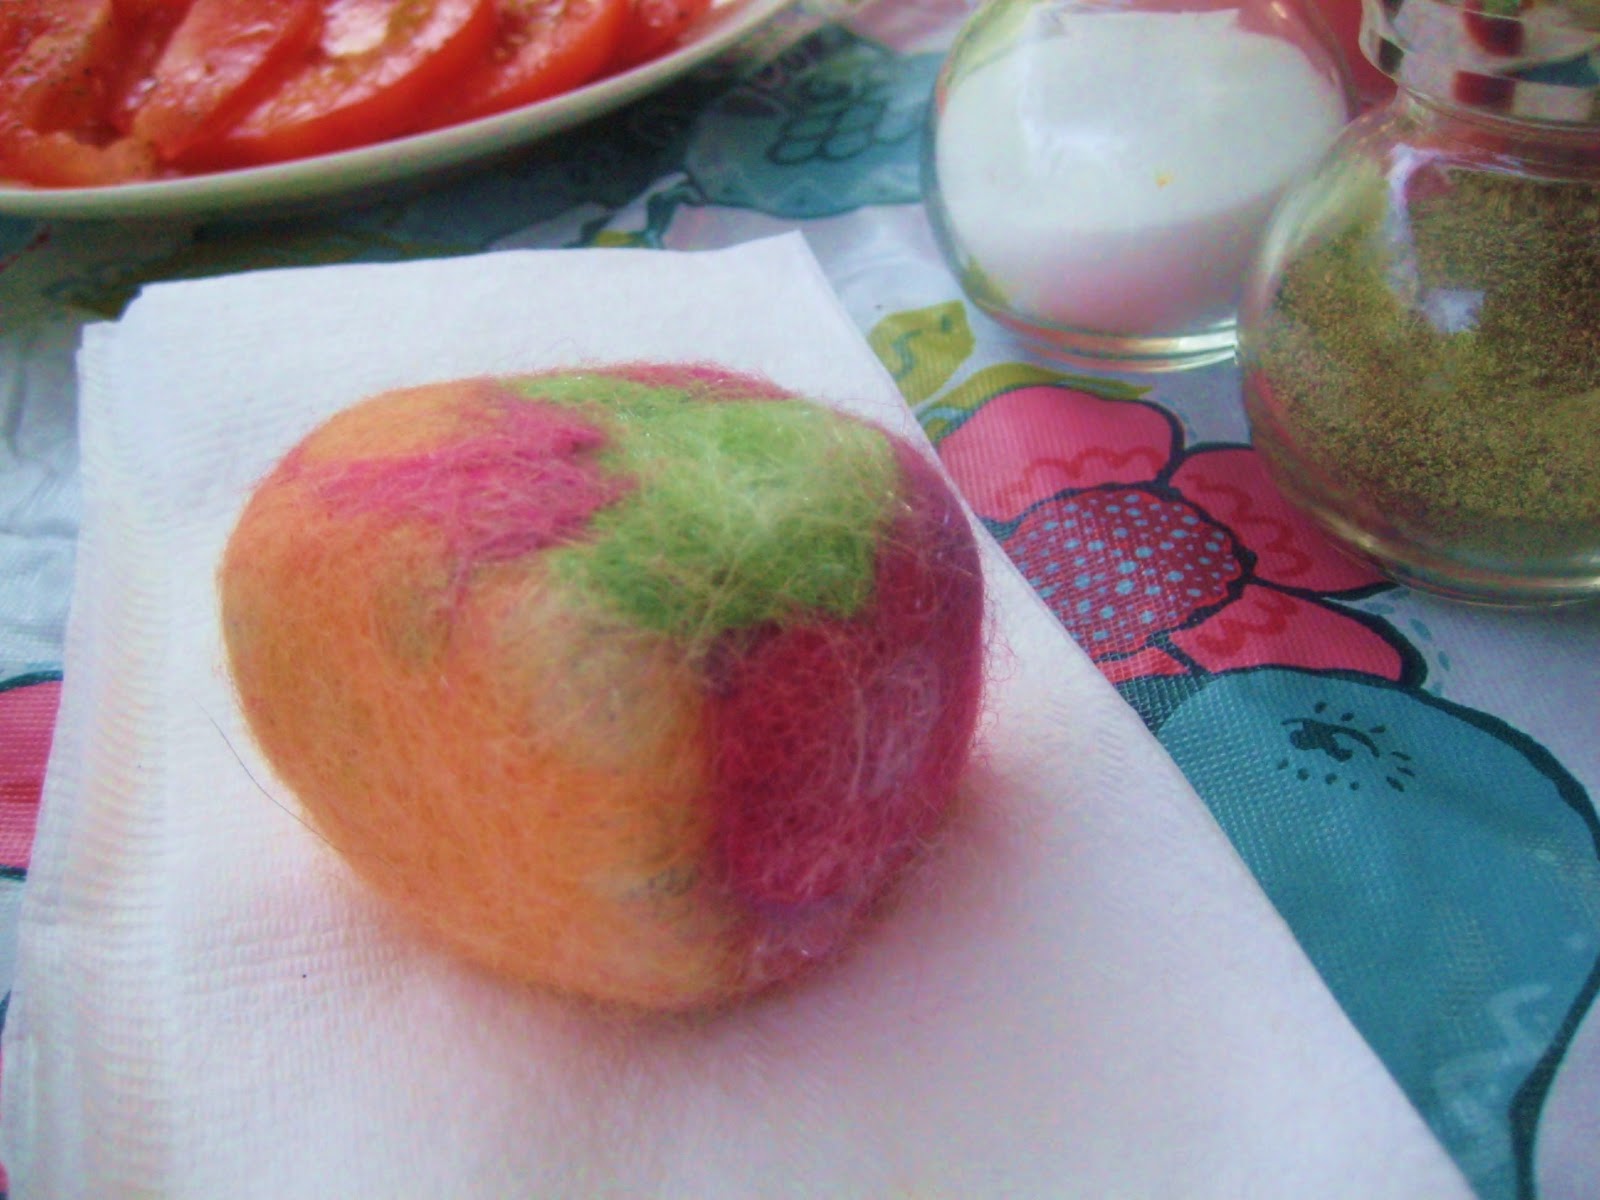
Wet Felted Rocks

We are totally felt crazy here at the 4 Crazy Kings.

We have made felted soap, ornaments, beads, art pieces, fairy crowns, flower barrettes, and change purses. Quickly running out of things to felt we heard you could wet felt a rock. A rock? You might be asking yourself why? Well, with summer almost here we have been eating outside almost every night. We found a small felted rock makes the perfect napkin weight.  A larger rock makes an excellent doorstop.  We even made a few "hamster" rocks for the kids friends.  They have actually been a big hit. Who knows, maybe we could single handily bring back the pet rock!


They are pretty fun to make and Michael's craft store recently started selling wool roving. Although you will get a better selection of colors on line or if you are lucky enough to live near a store like New England Felting in Massachusetts.  Wool and sheep shows are also a great source.


The small rocks are easy for little kids to felt.  There are plenty of YouTube videos on how to wet felt.  With kids I would help them layout the felt and wrap around the rock. Several layers are necessary to get good coverage.  Place rock wrapped in felt into a knee high pantie hose. Tie off pantie hose and then have them start the felting process.


You can see the smaller rock needs to be felted better. Depending on the age and attention span of your child you may end up with some partially felted rocks.  No worries.  You can always have them go back and continue felting another time. Just add soap, warm water and continue rubbing.

Have fun crafting with your kids!

Dragon Crown Craft

Sorry, it is a bit late to be posting a Lunar New Year Craft.
Fortunately, dragon crafts are fun year round.

I volunteered in Em's class this week. I read a book and provided this craft.

I started with 4 packages of bulletin board border paper in red, silver and gold. 2 packs were wide and 2 were thin.  I was able to make 23 crowns with lots of paper left over.

Fold the thin border paper in half. Cut. This will be your dragon's body.
The top of the paper is already wavy. Mimic the wave on the body along the bottom. Notice the tail narrows. It was very quick to do. Don't worry about making them identical or perfect.

I stapled the body onto the premeasured (hold up to your child's head and wrap around their head allowing for overlap to accommodate kids with larger heads) wide border paper. Line up the end of the tail to the end of the wide paper and staple.

I used white coffee filters to give the dragon some flair. You can cut them to make them fancier or just fold them in half and glue them on. The head is made from the wider border paper scraps. Fold in half the long way. Cut out 8 shaped head adding as much or as little detail as you want. I glued all the heads onto the crowns since Em's preschool class was going to be making them. Older kids could do this step.
I also added curling ribbon for the whiskers.

Cut out and accordion fold strips for legs. Make sure you cut out extras. Several kids in Em's class glued on 8-10 legs on their dragons.

Make sure you have lots of gems, google eyes, pom poms, feathers, stickers, sequins and paper scraps for the kids to glue on.


Once dry staple crowns closed.

Have fun crafting with your kids! Mama King

Another Cardboard Box...

Open for business!

We get very excited anytime a giant cardboard box comes our way! We've made houses and puppet theaters in the past. This time we needed (mom needed) to make something that gave the girls their (much needed) space.  The two window cafe solution worked beautifully.  They ended up playing harmoniously for hours. Got to love that!!

Lu's Menu

Em's Menu


"Stop taking pictures Mom! I want to play."

Kids Craft: How to Make a Quick Doll Closet


This Christmas, Lulu's Grandma bought her an American Girl Doll.  Needless to say, she has been obsessed with her doll Kanani. Just when life couldn't get any better for this 6 year old her Auntie in Hawaii sends her a "real Hawaiian" outfit. Those are her words. The icing on the cake...the outfit came with a doll hanger. This prompted the question, "Where am I going to hang her new dress?!" Followed by, "I need an American Girl Doll Closet."

After I finished laughing in my head knowing there was no chance we would be buying a $$ AGD closet. I told her we could make one. So...I had to think quick. This is what I came up with on the fly. I used an old box but am thinking that we would eventually upgrade to a nice new white box and a dowel.


I used the inside heavy craft paper found at the end of some wrapping paper rolls. Trim the paper roll. Make sure the rod is longer than the width of the box. Wind the paper roll tightly to make it smaller in diameter and stronger.Tape in place (use packing tape) to make sure it doesn't unroll.


Next measure and cut openings on the sides of your box for the rod. I just made an * (like an X shape but with a few more cuts) with a kitchen knife and bent the tabs in. Thread your rod through the openings. Use rubber bands on either side to secure into place.  Lu likes to use these side bits to hang her doll's beach bag and bathing suit from.


Here is the outfit that started the whole thing. Adorable! By the way, Lu is a stickler for rules and once she found out that Friday is Aloha Friday in Hawaii...well, Kuhnani is dressed every Friday in her Aloha wear.


The top is the hanger that came with the dress. Below is one that I fashioned from a metal hanger. You just need a heavy duty set of pliers and a metal snipper thing (can you tell I know my way around a tool box!)


My American Girl loves her new closet and even spent a good part of an afternoon decorating it with stickers and gluing pictures of animals and flowers on the outside.

Of course you can decoupage or paint your box. So many possibilities!

All and all, another crafting emergency averted! Have fun crafting with your kids, Mama King

Girl Scouts: Daisy Flower Garden


For Lulu's Girl Scout Daisy Investiture Ceremony I made a flower box with the GS Promise on the side. Each girl decorated a craft foam flower to "plant" in our troop garden. They "planted" the flower before they recieved their vests.


The stems were made from a bamboo skewer wrapped with green pipe cleaners. I added a foam leafe by unching the leaf onto the skewer then wrapping securely in place with the pipe cleaner.

The flowers were precut flower shapes bought from Michael's. I sandwiched the two together on the end of the skewer using hot glue to secure them in place. 

We took photos of the girls with their vests on. I will add their pictures to the other side of the flowers using my circle punch.

This would be a fun activity for a classroom garden theme as well.

Homemade Ornaments with Shrinky Dinks


Dear Santa, I want 2 JB (Justin Bieber) Cards, More Squinkee(s) (and) slippers (heart) Lulu


Dear Santa, 51 Stuf(fed) Animal Dogs (heart) Emme

Capture your kids top 3 wish list gifts on a Shrinky Dink blank page. I cut an 8x10 blank Shrinky Dink page in half to make 2 ornaments. Have the kids write their must haves from their Santa list on the page, decorate, punch holes and bake. We used sparkly pipe cleaners to create the hanger.  It will be fun to look back on these ornaments years from now.  We may do this every year!

Thanks to my friend MB for the idea and the Shrinky Dink Blank Sheets! I couldn't find any at my Michael's Store.

Homemade Holidays: Ornament Crazy!


I have been a bit obsessed with needle felting these last few weeks. I have been making 100% wool ornaments by repeatedly sticking a special needle into the wool.  I begin by making the ball then I freehand the design onto the ball. There is something so relaxing and creative about the process. I am just a beginner so I would recommend checking out the web for instructions.

I love the scarf!

I still need to add the olive branch.

My girls really like this one.

I added beads to this one. My friends daughter taught me how to do it!

This last ornament is a project I am going to do with my Daisy Troop.  I just became a co-leader. The girls are earning their center patch. The ornament represents the patch and learning their pledge.

Stale Bagel Bird Feeder


After the Thanksgiving festivities we ended up with a few rock hard bagels. The girls and I turned them into bird feeders. Cut bagel in half. Tie a string onto the bagel. 


We spread Crisco on them but you could use peanut butter.
Then sprinkled them with bird seed.


A great treat for your neighborhood birds...and squirrels! If you don't have a stale bagel you can use a pine cone. You can also have kids string O cereal onto a pipe cleaner, twist to close and then hang on a branch.

Here are some other bird feeder ideas:


Homemade Holiday Gift: Felted Soap


With some assistance my 4 year old and 6 year old were able to make their own wet felted soap.
My 4 year old really loved getting sudsy! My 6 year old did not. If you have a kid that loves rolling up their sleeves and getting dirty (in this case, clean!) this is a great activity.

The wool roving for wet felting is available on line.  The roving comes in an array of colors.  You only need an ounce each of  3 or 4 colors to cover several bars. I just ordered some Ecosoft Roving from Weir Crafts for $2.25 an ounce. There are many other options available on line.


Setup: Cover your table with a towel. Have some extra hand towels nearby.

Old panty hose or knee high, bar of soap, roving, and container of  very warm water


Check out YouTube to get started. I haven't found one that uses my particular method. See the tips I have below.

Tips:
  • When making felted soap with kids I suggest dipping the soap in the very warm water first. Then wrap the wool roving around the soap. This helps the roving stick better.
  • Wrap in several layers of the roving until you cant see any soap peeking through.
  • I like to have the roving ready to go in small "sheets" so I can lay them out for my kids. They lay the wet soap on top of one "sheet" then wrap around the sides of the soap. Then we carefully pick up the soap and flip it over so the top of the soap is now face down on the next sheet. Continue until completely covered.
  • Next, hold open a nylon stocking very wide and have your child carefully place inside. You can tie off the stocking or just wrap it around.
  • Have your child dip the soap in very warm water.
  • Begin rubbing very gently at first. You want to create a lather. As the soap starts to felt they can get more aggressive with the rubbing. 
Good luck! It is a great handmade gift. When the soap is used up you are left with a wool pouch. I have heard it makes a nice pot scrubber.

Have fun crafting with your kids this Holiday!

LinkWithin

LinkWithin Related Stories Widget for Blogs